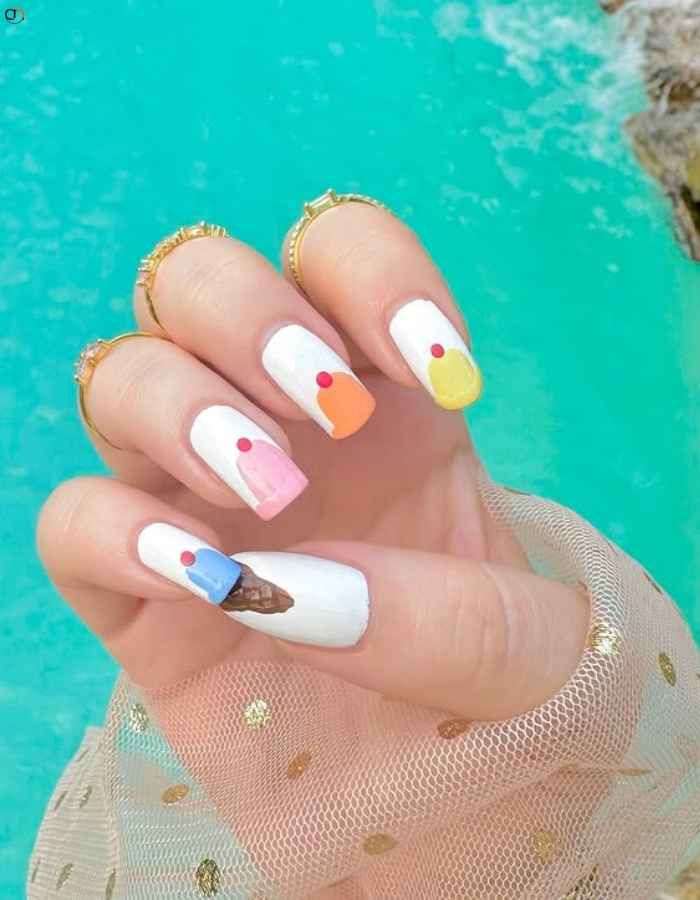
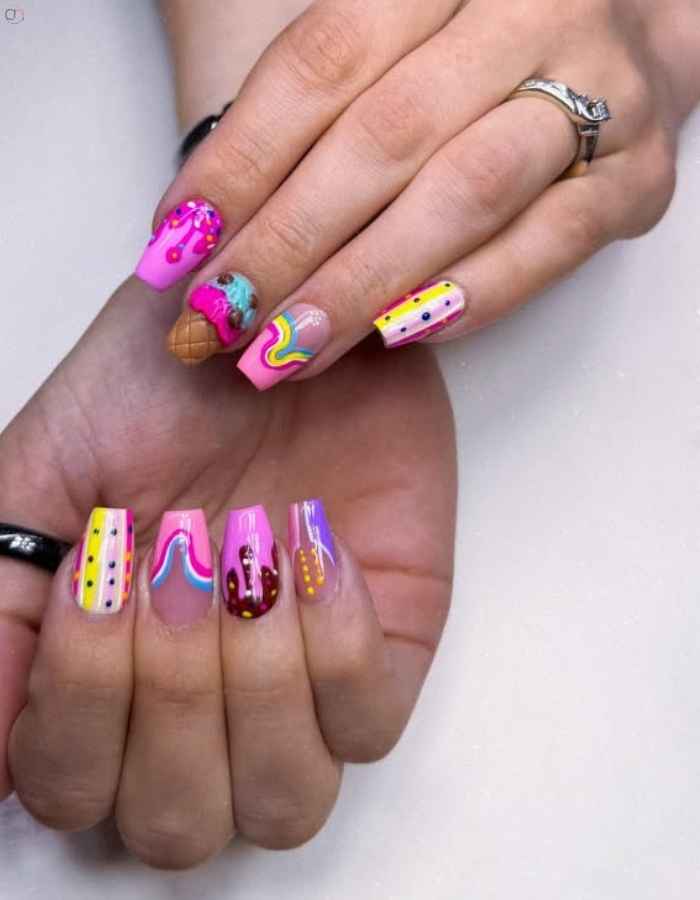
Ice Cream Nails Ideas
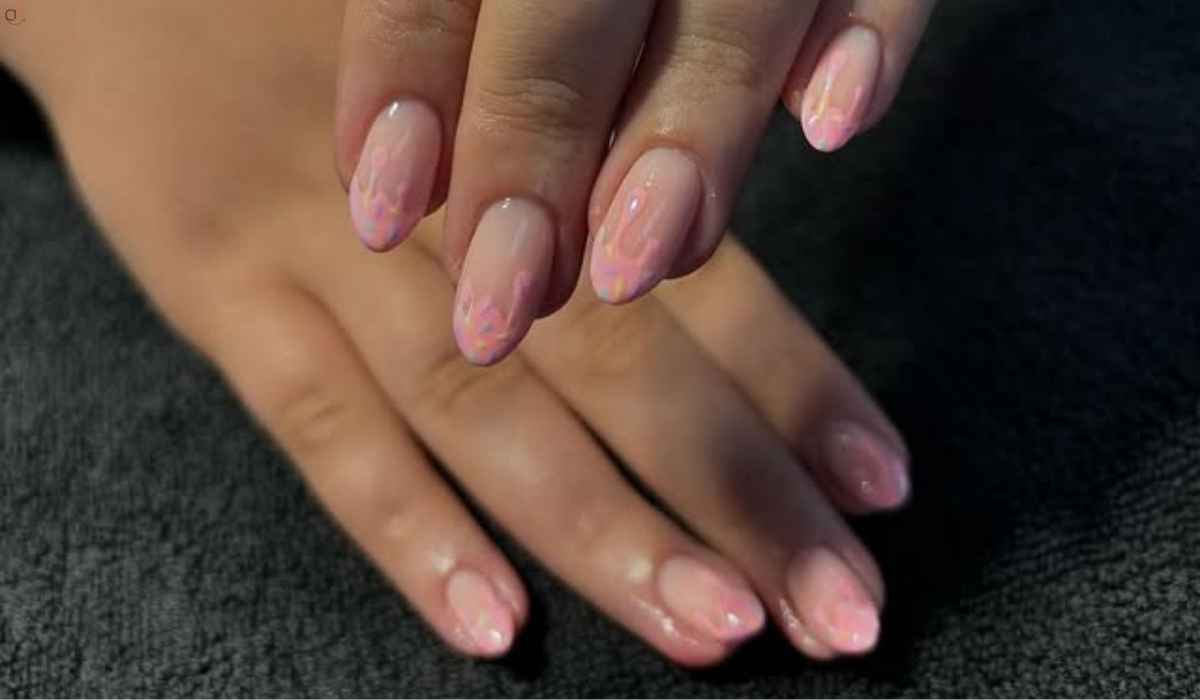
Ice cream isn’t just a summer treat—it’s a vibe. And now, it’s making its way from dessert bowls to fingertips with the adorable trend of ice cream nails. Think soft pastel swirls, sprinkle accents, waffle cone patterns, and drips that look good enough to eat.
If you’re heading to a summer party or just want to add a little playfulness to your everyday style, an ice cream manicure is the perfect mix of fun and fashion.
In this post, we’ll share tips, design ideas, and DIY tricks to help you get the sweetest nails around—without the mess (or the calories).
Let’s scoop into the trend!
Ice cream nails | Ice Cream Manicure Tips:
Ice Cream Nails are fun, playful, and perfect for warm weather or themed occasions. Whether you’re going for pastel drips, cone textures, or pops of glitter, these tips will help you get the look just right.
1. Choose the Right Color Palette
Go for classic ice cream shades like soft pinks, mint greens, creamy yellows, and chocolatey browns. Pastels and sorbet hues work especially well to give that light, dreamy aesthetic.
2. Get Creative with Drip Designs
Use a dotting tool or small brush to create melting “drips” near the nail cuticle or tip. Apply a contrasting color for the drip effect—like white on pink or chocolate brown over mint.
3. Add Cone Textures or Patterns
Use nude or light brown polish to mimic waffle cone patterns. A fine nail art brush or stamping tool can help create the signature crosshatch lines.
4. Include Fun Details
Incorporate sprinkles, tiny fruit decals, or glitter for a “toppings” vibe. Nail stickers or rhinestones can add an extra pop of fun without the mess.
5. Use Gel Polish for Lasting Results
Gel polish ensures your design lasts longer without chipping—essential for intricate nail art. Be sure to cure each layer under a UV or LED lamp for durability.
6. Prep and Prime Your Nails
Always start with clean, filed nails and a base coat to prevent staining. Good prep helps your manicure stay smooth and last longer.
7. Don’t Rush the Design
Let each layer dry or cure properly before moving on to prevent smudging. Nail art takes patience—especially with detailed designs like these.
8. Seal with a Glossy Top Coat
A shiny top coat enhances the ice cream look by adding a “melty,” glossy finish. It also protects your design and keeps it looking fresh.
DIY Ice Cream Manicure Tips:
Bring the charm of your favorite frozen treat to your fingertips! With a few tools, the right colors, and a bit of patience, you can create a playful Ice Cream Nails from the comfort of home.
1. Prep Your Nails
-
Clean & trim your nails, push back cuticles, and lightly buff the nail surface.
-
Apply a base coat to protect your nails and create a smooth canvas.
2. Pick Your Ice Cream Colors
-
Choose 2–4 pastel or “ice cream” colors: mint, pink, lavender, creamy yellow, or light brown.
-
You’ll also need a neutral or nude shade if you’re adding cone details.
3. Create the Dripping Effect
-
Use a dotting tool or a toothpick to apply round “drips” near the cuticle line.
-
Connect the dots with curved lines to form the melting look.
-
Let each color layer dry fully or cure under a gel lamp if using gel polish.
4. Add Cone Details (Optional)
-
Paint a triangle or half-nail with a nude shade to mimic the cone.
-
Use a thin brush to draw crosshatch lines for a waffle texture.
5. Decorate with “Toppings”
-
Add sprinkle dots using a toothpick and various polish colors.
-
Use tiny gems, glitter, or nail stickers to mimic candy, cherries, or syrup.
6. Seal the Look
-
Apply a shiny top coat to give your nails that glazed, melty finish.
-
For gel polish, cure the top coat under the lamp for lasting wear.
7. Aftercare
-
Moisturize cuticles with oil and hands with lotion after your nails are fully dry.
-
Avoid hot water or rough use for the first few hours to extend the life of your art.
Salon vs. At-Home: What’s Best?
Salon Benefits
-
Professional Precision: Nail techs have the skills and tools to create flawless, detailed drip and cone designs.
-
Long-Lasting Gel Polish: Salons use high-quality gel polishes and curing lamps for a durable, chip-resistant finish.
-
Time-Saving: The pros handle the whole process, letting you relax without worrying about mistakes.
-
Added Pampering: Enjoy a relaxing hand massage, cuticle care, and expert advice.
At-Home Benefits
-
Cost-Effective: DIY is much cheaper than salon visits and lets you experiment with different styles.
-
Creative Freedom: You can customize colors, designs, and nail lengths anytime you want.
-
Convenience: No appointment needed—you can do your nails whenever you have free time.
-
Fun Activity: It’s a creative, relaxing hobby that can even be a social event with friends or family.
What to Consider
-
If you want perfect, long-lasting results and pampering, a salon visit is ideal.
-
If you enjoy DIY creativity and prefer saving money, at-home is a great choice.
-
For complex designs, you might start at a salon and then maintain or refresh at home.
Maintenance & Aftercare:
Keeping your ice cream-inspired nails looking sweet and flawless requires a little care, whether you got them done at the salon or DIYed at home.
1. Moisturize Regularly
Keep your cuticles and hands hydrated with cuticle oil and hand cream daily. This prevents dryness and helps your manicure last longer.
2. Protect Your Nails
Wear gloves when doing household chores, especially those involving water or harsh chemicals. This prevents chipping and weakening of your polish.
3. Avoid Using Nails as Tools
Don’t use your nails to open cans, peel stickers, or scratch surfaces—it can cause chips or damage to both nails and polish.
4. Touch Up Chips Quickly
If you notice any small chips or cracks, touch them up with matching polish and reseal with a top coat to prevent further damage.
5. Be Gentle with Water
Limit soaking your nails in water for long periods (like baths or washing dishes) as it can weaken the polish and cause lifting.
6. Plan for Removal
Gel polish should be removed properly with acetone soak or by a professional to avoid damaging your natural nails. Avoid peeling or picking at your manicure.
7. Schedule Regular Fills or Refreshes
If you have gel or acrylic enhancements, maintain them every 2–3 weeks to keep nails healthy and polished-looking.
Follow these aftercare tips to enjoy your fun, melty ice cream manicure as long as possible!
Key Take Away:
- Ice cream nails are a fun and creative way to express your style, blending playful colors and textures for a fresh, summery look.
- If you choose to DIY or visit a salon, proper prep, patience, and aftercare are key to achieving a flawless, long-lasting design.
Read Next: Gel Manicures Ideas
FAQs:
1. Can I do an ice cream manicure at home if I’m a beginner?
Absolutely! Start with simple drip designs using a dotting tool or toothpick, and practice patience with layering and drying times.
2. How long does a gel ice cream manicure last?
When done correctly, gel manicures can last 2-3 weeks without chipping or fading.
3. What’s the best way to remove gel polish at home?
Use an acetone soak-off method with cotton balls and foil wraps—avoid peeling or scraping to protect your nails.
4. Can I customize the colors and toppings?
Yes! Feel free to mix pastel shades, glitter, rhinestones, or decals to match your personality and mood.
5. How do I prevent my ice cream manicure from chipping quickly?
Keep your nails moisturized, avoid using them as tools, and wear gloves when doing chores involving water or chemicals.