
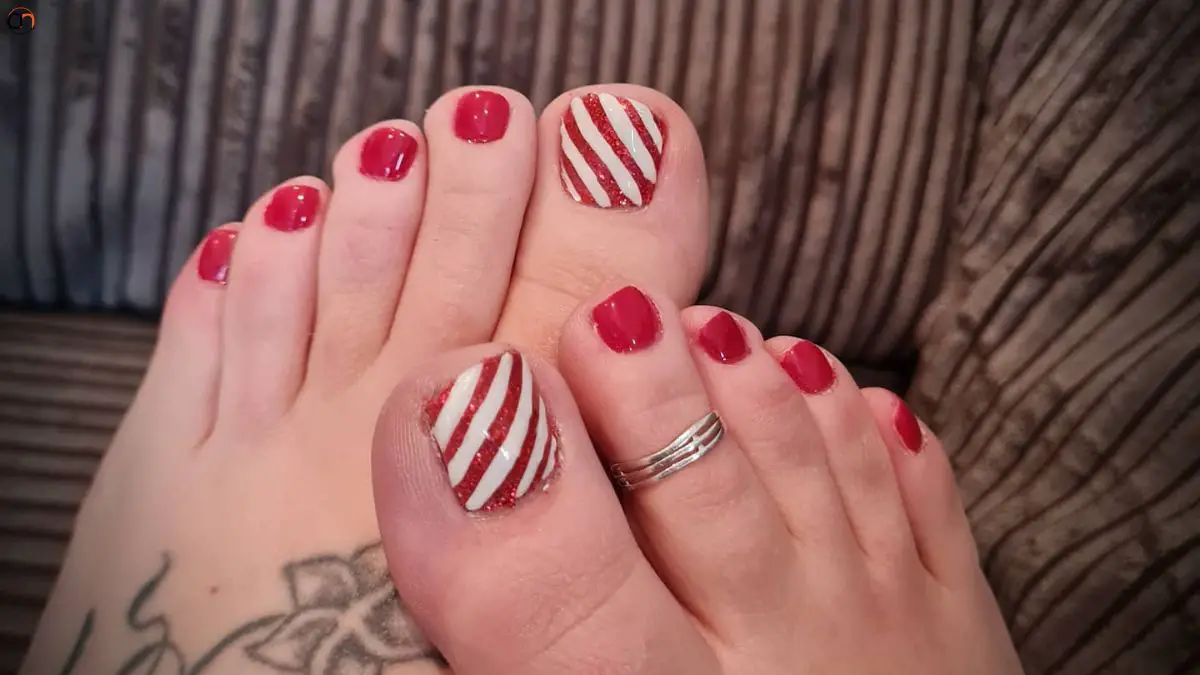
Add a festive flair to your holiday look with a Candy Cane Pedicure! Featuring the classic red and white stripes of the season’s favorite treat, this cheerful nail style is perfect for spreading holiday cheer.
If you’re dressing up for a party or relaxing at home, a candy cane pedicure is the perfect way to embrace the spirit of the holidays.
What Is a Candy Cane Pedicure?
A candy cane pedicure is a festive and fun nail art design that mirrors the classic red and white stripes of a candy cane. It’s a perfect holiday-inspired look, featuring bold red and crisp white lines that add a touch of cheer to your nails. You can keep the design simple with just the signature stripes or get creative by adding glitter, metallic accents, or holiday-themed details like snowflakes or stars.
This pedicure brings a playful, seasonal flair to your toes, making it a great choice for any holiday occasion. Whether you’re attending a party or just enjoying the season at home, a candy cane pedicure is sure to spread festive vibes and make you smile!
Candy cane pedicure | Step-by-Step Guide:
View this post on Instagram
A candy cane pedicure is a playful and festive way to get into the holiday spirit. Whether you’re preparing for a Christmas party or just want to treat your toes, here’s a simple step-by-step guide to help you achieve the perfect candy cane design.
Step 1: Nail Preparation
Start by removing any old nail polish and cleaning your nails thoroughly. Shape your nails to your desired length and file them into a neat shape. Gently push back your cuticles, then apply a base coat to protect your nails and create a smooth surface for the design.
Step 2: Apply the Base Color
Paint your nails with a coat of white nail polish as the base for the candy cane stripes. Let it dry completely to avoid smudging the design.
Step 3: Create the Stripes
Using a thin nail art brush or striping tape, carefully paint red stripes diagonally across each nail. Start from one corner and work your way across, leaving space between each stripe for the traditional candy cane look. You can make the stripes as wide or narrow as you like.
Step 4: Add Some Sparkle (Optional)
For extra holiday glam, add a layer of glitter polish over the red stripes, or apply small rhinestones to the tips of your nails for a little extra sparkle.
Step 5: Seal with Top Coat
To lock in your design and ensure it lasts, apply a clear top coat over the entire pedicure. This will give it a smooth finish and a shiny, glossy appearance.
Step 6: Clean Up
Use a small brush or cotton swab dipped in nail polish remover to clean up any excess polish around your nails and cuticles for a crisp, polished look.
Step 7: Dry and Enjoy
Allow your candy cane pedicure to dry fully before walking around or putting on shoes. To speed up the drying process, you can use a fast-drying top coat or nail drying spray.
Now you have a stunning candy cane pedicure that’s perfect for the holiday season.
Variations and Inspiration:
While the traditional red and white candy cane design is a holiday classic, you can always add your own spin to make your pedicure even more special. Here are some fun variations and inspiration to help you create the perfect festive look!
Glitter Candy Cane Pedicure: Add some sparkle by incorporating glitter into your candy cane stripes. You can either add glitter to the red stripes or use a glitter top coat for a dazzling effect, perfect for celebrating the season in style.
Reverse Candy Cane Pedicure: Switch things up by flipping the classic design. Instead of the red stripes on white, go for white stripes on red, creating a bold and fresh look that stands out in a fun, unexpected way.
Winter Wonderland Candy Cane: Mix snowflakes, holly, or other winter-themed designs with your candy cane stripes. Snowflakes on accent nails or scattered across the candy cane design bring a whimsical, wintery touch to your pedicure.
Pastel Candy Cane Pedicure: If you prefer softer tones, swap out the traditional red and white for pastel hues like light pinks, blues, or purples. Pastels offer a gentle, more modern take on the holiday design, perfect for those who like a subtle, festive look.
Polka Dots and Candy Cane Stripes: Give your pedicure an extra playful vibe by incorporating polka dots alongside the candy cane stripes. Add white or multi-colored dots to the stripes for a fun, bubbly effect that’s full of holiday cheer.
Ombre Candy Cane Pedicure: For a trendy, seamless look, try an ombre effect with the red and white stripes. Create a soft gradient that fades from one color to the other, adding a smooth, elegant twist to the classic design.
Matte Candy Cane Pedicure: For a chic and modern update, try a matte finish instead of the usual glossy look. A matte candy cane pedicure offers a unique texture and sophisticated feel while still keeping things festive.
Accent Nail Candy Cane: If you prefer a simpler design, focus on just a few accent nails with the candy cane stripes. Keep the rest of your nails solid red, white, or a coordinating color for a balanced, minimalist approach.
Candy Cane French Tips: A creative twist on the classic French manicure, add candy cane stripes to the tips of your nails. This design is sleek, easy to wear, and still feels festive for the season.
Neon Candy Cane Pedicure: Want something bold and eye-catching? Try neon candy cane stripes in bright colors like hot pink, electric green, or vibrant blue. This twist on the classic will make your pedicure stand out with a fun, energetic vibe.
There’s no limit to how you can personalize your candy cane pedicure! So, grab your nail polish and have fun creating your perfect festive look this season!
Tips for Maintaining Your Pedicure:
To ensure your candy cane pedicure stays fresh and flawless throughout the season, follow these essential maintenance tips:
Let Your Pedicure Dry Completely: Make sure your nails are fully dry before putting on socks or shoes. Allow at least an hour for your pedicure to set to prevent smudges or chips.
Keep Your Feet Moisturized: Moisturize your feet daily with a rich foot cream or body butter to prevent dry skin. Nourish your nails and cuticles with oil to keep them hydrated and looking fresh.
Fix Chips Immediately: If you spot a chip or crack, touch it up right away with a bit of the same polish and finish with a top coat to prevent further damage.
Protect from Harsh Chemicals: Wear gloves when cleaning or doing dishes to avoid exposing your pedicure to harsh chemicals that can weaken or chip the polish.
Exfoliate Regularly: Exfoliate your feet with a scrub or pumice stone weekly to keep your feet soft and smooth. This will help your pedicure last longer by removing dead skin.
Apply a Fresh Top Coat: Reapply a top coat every few days to maintain the shine and protect the design from chipping. It will help your candy cane pedicure look glossy and vibrant.
Avoid Picking at Nails: Resist the urge to pick at your nails or cuticles as this can cause chips and make your pedicure look uneven.
Limit Hot Water Exposure: Long exposure to hot water can weaken your pedicure, causing it to chip. Keep your feet out of hot water when possible to prolong the life of your nails.
Choose Open-Toed Shoes: Opt for open-toed shoes or sandals to avoid smudging your nails when your pedicure is still drying or fresh.
Schedule Regular Pedicures: To keep your feet and nails looking their best, consider getting a professional pedicure every few weeks. This ensures that your candy cane design stays flawless and your nails stay healthy.
With a little care, your nails will shine with the perfect holiday spirit!
Last Call:
A candy cane pedicure is a fun and festive way to get into the holiday spirit while giving your feet a treat. Featuring cheerful red, white, and green stripes, this design is perfect for the season.
With our step-by-step guide and maintenance tips, you can keep your candy cane pedicure looking fresh for weeks.
So, why not indulge in some holiday fun and pamper your feet today? Try it out yourself or book a session to enjoy this playful look all season long! Get In touch on Pinterest.
Read Next: 20 Toe Nails Design
FAQs:
Q. What is a candy cane pedicure?
A candy cane pedicure is a holiday-themed nail design featuring red, white, and green stripes inspired by the classic candy cane.
Q. Can I do a candy cane pedicure at home?
Yes, you can! With the right tools, polish, and a little creativity, you can easily achieve a candy cane pedicure at home.
Q. How long does a candy cane pedicure last?
A candy cane pedicure typically lasts 1-2 weeks, depending on the type of polish used and how well you maintain it.
Q. What other designs can I add to a candy cane pedicure?
You can add accents like glitter, rhinestones, or even snowflakes for a more festive touch.
Q. Can I wear a candy cane pedicure year-round?
While it’s perfect for the holiday season, you can certainly wear a candy cane pedicure anytime you want to add some fun, festive flair!